What is Scratch Programming ?
The Scratch Programming is block based Language which helps them kids friendly . This Programming Language is Especially made for Kids to make them understand the concepts of coding in a easier way . Kids from age of 6 find it easier to kids . Scratch is a fantastic tool for introducing young learners to the world of programming. Its visual, block-based interface makes it easy for kids to grasp fundamental coding concepts without getting bogged down by complex syntax .By using colorful, drag-and-drop blocks, you can create interactive stories, games, and animations.
Blocks in Scratch
We have various Blocks in Scratch Programming like Motion Blocks which helps in Moving the Sprite from one place to another place , Looks Block which is used to make the Sprite talk or think on it’s own etc . Let’s Discuss properties of each block in simple way .
My Blocks: These blocks let you create your own custom blocks, making your code more organized and reusable.
Motion: These blocks control the movement of sprites on the stage. They allow you to:
Motion Blocks : These blocks control the movement of your sprites around the stage.
Looks Blocks: These blocks change the appearance of your sprites, like their costumes or size.
Sound Blocks: These blocks add sound effects and music to your projects.
Event Blocks: These blocks trigger the start of your scripts, such as when the green flag is clicked or a key is pressed.
Control Blocks: These blocks control the flow of your scripts, like repeating actions or making decisions.
Sensing Blocks: These blocks allow your sprites to sense things, like the mouse position or key presses.
Operator Blocks: These blocks perform mathematical and logical operations.
Variables Blocks: These blocks store and manipulate data in your projects.
Motion Block : These blocks control the movement of sprites on the stage. They allow you to:
Move sprites forward, backward, or to specific x-y coordinates.
Change the direction of a sprite’s movement.
Glide smoothly between two points.
Turn sprites clockwise or counterclockwise.
Set the sprite’s x and y coordinates.
Looks: These blocks control the appearance of sprites. They let you:
Change a sprite’s costume.
Say or think something.
Change a sprite’s size or effect.
Show or hide a sprite.
Change the backdrop.
Sound: These blocks control the sound effects and music in your project. They allow you:
To play sounds.
To change the volume of sounds.
To stop sounds.
Events: These blocks trigger the start of scripts. They include:
- When the green flag is clicked.
- When a key is pressed.
- When a sprite is clicked.
- When a timer starts.
Control: These blocks control the flow of your scripts. They allow you to:
- Repeat a block or group of blocks.
- Wait for a certain amount of time.
- Make decisions based on conditions.
- Stop a script.
Sensing: These blocks allow your sprites to sense things about the environment. They can:
- Detect the mouse’s position.
- Check if a key is pressed.
- Sense the distance to another sprite.
- Ask the user for input.
Operators: These blocks perform mathematical and logical operations. They can:
- Add, subtract, multiply, and divide numbers.
- Compare values.
- Combine logical conditions.
Variables: These blocks allow you to store and manipulate data. You can create variables to store numbers, text, or other information.
Advanced Block Category:
- My Blocks: These blocks allow you to create your own custom blocks. This helps you organize your code and reuse it in different parts of your project.
By combining these blocks in creative ways, you can create a wide variety of interactive projects, from simple animations to complex games.

LOOKS BLOCK
Looks blocks are like a magic wand for your sprites. They let you change how your sprites look, what they say, and even how big or small they are. Let’s dive into the colorful world of Looks blocks:
Change Costume:
- Imagine your sprite is an actor. This block lets your sprite change its costume, just like an actor changes their outfit.
- You can create different costumes for your sprite and use this block to switch between them.
- For Example : In First image the Costume is on bear-a therefore it’s on it’s four legs then with the second image the bear is standing using just two legs while changing the costume to bear-b.


Next Costume:
- This block is like flipping through a book. It automatically switches your sprite to the next costume in its costume list.
- Say Hello!:
- This block makes your sprite say something. You can replace “Hello!” with any message you want. Your sprite will appear to be talking a bubble of text.
- Think Hello!:
- Similar to “Say Hello!”, but instead of a speech bubble, a thought bubble appears above your sprite’s head.
- Change Size by 10:
- This block makes your sprite bigger or smaller. If you use a positive number, it grows. If you use a negative number, it shrinks.
- Set Size to 100%:
- This block sets the size of your sprite to a specific percentage. For example, 100% is the original size.
- Show:
- This block makes your sprite visible on the stage.
- Hide:
- This block makes your sprite invisible on the stage.
- Go to Front:
- This block brings your sprite to the front of the stage, so it appears on top of other sprites.
- Go to Back:
- This block sends your sprite to the back of the stage, so it appears behind other sprites.
Sound Block in Scratch : A Musical World for Your Sprites
Sound blocks add a musical touch to your projects. They let you play sounds, control their volume, and even stop them when you want. Here are some of the main sound blocks:
- Play Sound Effect Until Done:
- This block plays a sound effect and waits until it’s finished before continuing with the rest of the script.
- Play Sound Effect:
- This block plays a sound effect but doesn’t wait for it to finish. Your sprite can continue with other actions while the sound plays.
- Stop All Sounds:
- This block stops all sounds that are currently playing.
- Set Volume to 100%:
- This block controls the volume of sounds. You can set the volume to any number between 0 (silent) and 100 (loudest).
Let’s Work on a Simple Example on Looks Block
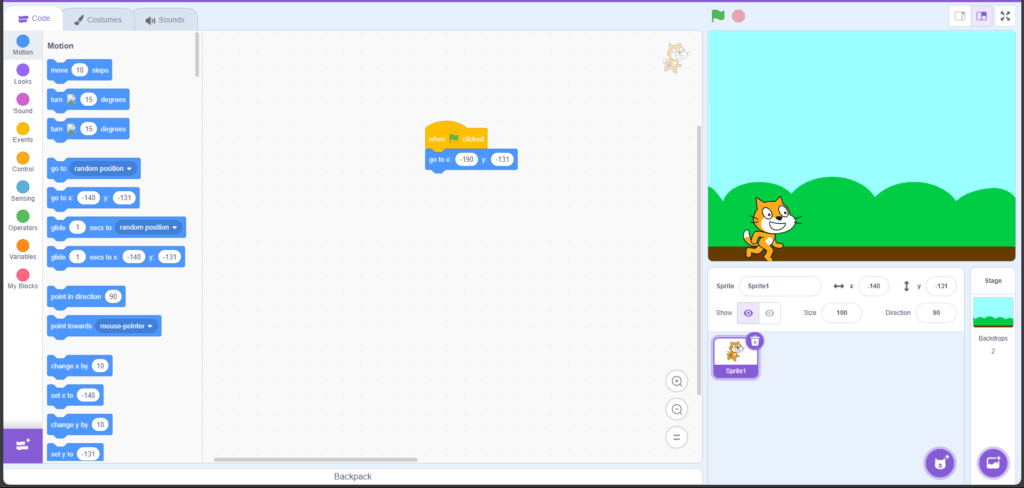
Step 1 : Let’s drag and drop Green Flag clicked block
Step 2: Drag and Drop go to block so that the Cat will start from that initial position every time the Green flag is been clicked .
Step 3 : Using say block to make the cat speak
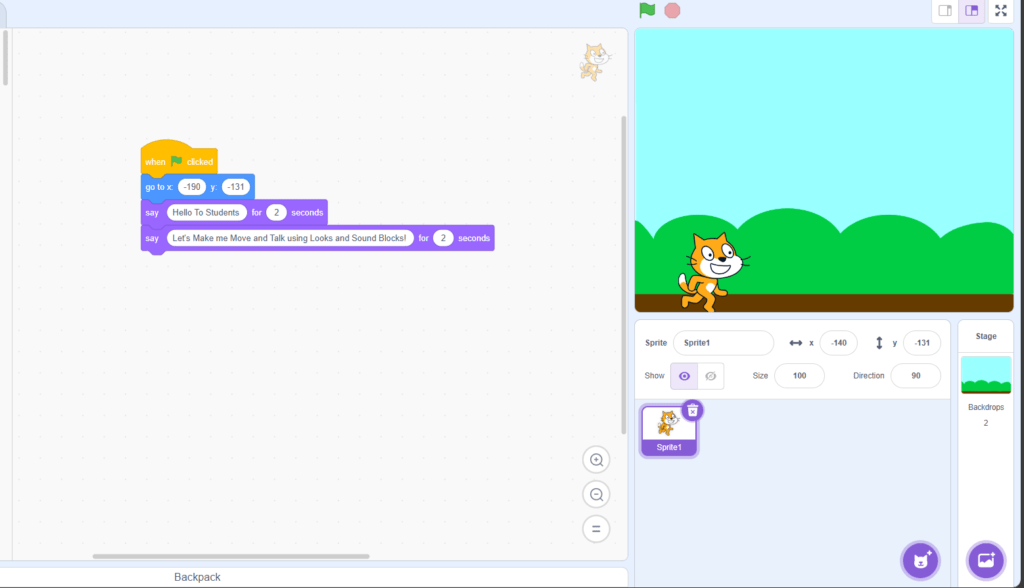
Step 4 : Changing from one costume to another costume so that the cat will keep changing the position using forever block and the cat will finally look like it’s walking

Step 5 : Drag and drop move 10 steps so that the cat will move from one place to another place

Step 6 : Finally, Drag and drop the Sound block where we have selected the Meow sound and Add a forever so that it keeps repeating it self so , never has an end.