Scratch Programing Project on Sprite Dance Party Scratch: The Basics
Table of Contents
Welcome to the second chapter of your Scratch programming journey! Now that we know what Scratch is and why it’s amazing, let’s dive in and start using it. This chapter is all about getting familiar with the Scratch interface and building something fun to bring those basics to life—a Sprite Dance Party! Yes, we’re going to make our characters groove to music while adding a touch of creativity and interactivity.
Ready? Let’s get started!
What is Scratch All About?
If you’ve just opened Scratch for the first time, you might be thinking, “Whoa, what’s all this?” Don’t worry! It’s easier than it looks. Think of Scratch like a canvas where you create things, except instead of paintbrushes, you use code blocks. And trust me, it’s super fun.
On your screen, you’ll see three main sections:
- The Stage: This is where your project comes to life. Think of it like a theater stage where your sprites (characters) perform.
- The Coding Area: This is where you drag and connect blocks to create instructions for your sprites. It’s like writing a script but with blocks instead of words.
- The Sprite List and Toolbar: This is where you manage your characters and customize them to make them unique.
Now that you know the layout, let’s move on to the fun part—our project!
What’s a Sprite Dance Party?
Imagine a bunch of characters grooving to a cool beat, moving, spinning, and maybe even changing colors. That’s what we’re building! It’s a beginner-friendly project where you’ll learn to move sprites, add music, and use events like key presses to make the party interactive. Plus, who doesn’t love a good dance party?
Step 1: Setting the Stage
Every great party needs a cool vibe, right? For that, we’ll set up a colorful background.
- Choose a Backdrop:
In Scratch, click on the “Choose a Backdrop” icon (it looks like a picture). You’ll see options like discos, neon tunnels, or even outer space. Pick something fun that screams “party.” Or, if you’re feeling artsy, click on “Paint” and create your own vibrant background. - Customize the Vibe:
Add a few extra elements like stars, disco balls, or anything you think fits. Your backdrop sets the tone, so make it lively!
Step 2: Picking Your Party Guests (Sprites)
Sprites are the stars of your party. These could be animals, people, robots, or even random objects like a toaster (why not?).
- Add Sprites:
Click on the “Choose a Sprite” button. Browse the library and pick 2–3 sprites. Popular choices include the Scratch Cat, the Penguin, or the funky Giga character. - Style Them Up:
Head to the “Costumes” tab for each sprite and dress them up. Add hats, glasses, or funky outfits. The more unique, the better.
Step 3: Let’s Code Some Dance Moves
This is where the magic happens—coding! Let’s get your sprites moving to the beat.
- Basic Movement:
- Drag the “when green flag clicked” block from the Events category. This is like pressing “Play” for your project.
- Snap a “forever” block from Control.
- Inside the forever block, add a “move 10 steps” block from Motion.
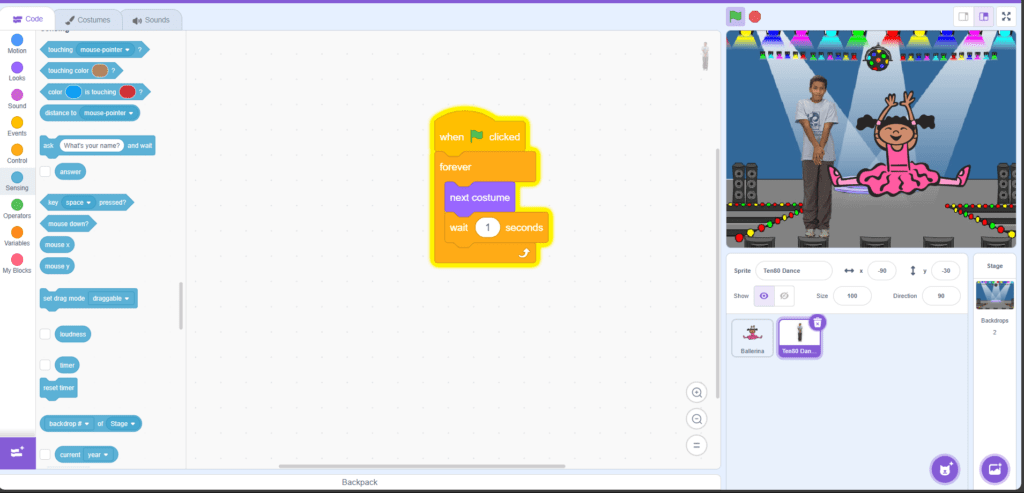
- Don’t forget to add an “if on edge, bounce” block so your sprite doesn’t disappear off the screen.
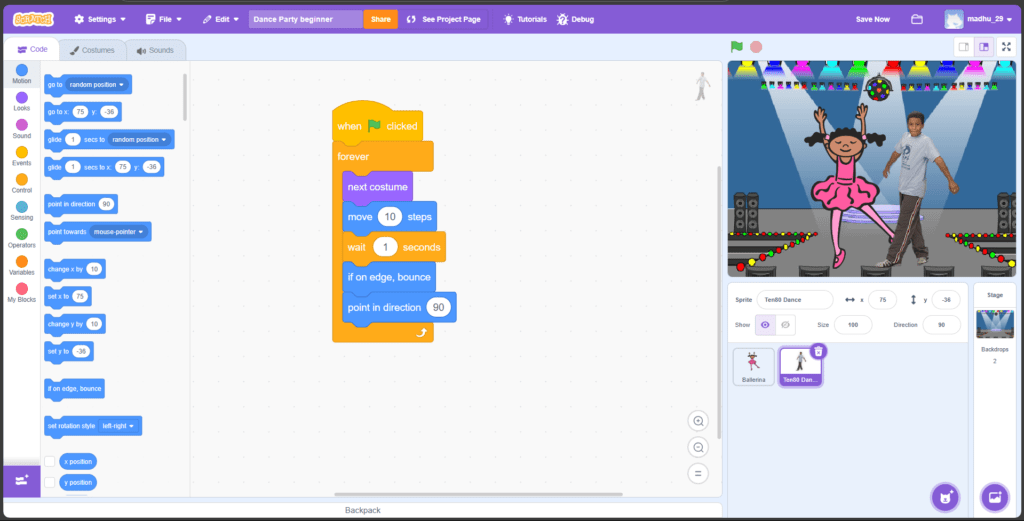
Press the green flag. Boom! Your sprite is moving!
- Add Some Spins:
Want your sprite to spin? Add a “turn 15 degrees” block from Motion inside the forever loop. Now your sprite is doing a little twirl.

- Jump to the Beat:
Use a “change y by 10” block to make your sprite jump up. Combine it with a “wait” block for a rhythmic hop.
Step 4: Adding Music
A dance party isn’t a party without music. Scratch makes it easy to add tunes.
- Choose a Sound:
Go to the “Sounds” tab and click on the sound library. Pick a catchy tune like “Dance Around” or “Disco.” - Play the Music:
In the Code tab, drag a “play sound until done” block from Sound and place it under the green flag block. For endless music, put this block inside a forever loop.

Step 5: Making It Interactive
Now let’s spice things up. What if pressing keys made your sprites do new moves?
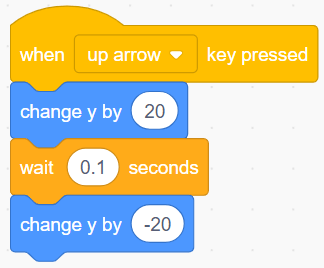
- Key Press Events:
Add a “when [key] pressed” block from Events.- Attach a “turn” block to make your sprite spin when you press the right arrow.
- Use a “change y by” block to make it jump with the space bar.

- Different Moves for Different Keys:
Get creative! Assign a unique move to each key. For example, the “up arrow” could make your sprite do a backflip.
Step 6: Adding Special Effects
Let’s make this party pop with some cool effects!
- Color Changes:
Add a “change color effect by 25” block from Looks to make your sprite change colors while dancing. Place it inside a forever loop for continuous fun. - Backdrop Switches:
Add a “switch backdrop to” block from Looks. Combine it with a “wait” block to change the backdrop every few seconds—like a light show!

Step 7: Testing and Debugging
Coding is like cooking; sometimes you need to taste and adjust. Run your project and see how it looks. If something doesn’t work as expected, don’t worry! Go back to your code, figure out what’s missing, and tweak it until it’s perfect.
Step 8: Sharing Your Dance Party
The best part about Scratch is sharing your work with others. Once your Sprite Dance Party is ready, click on the “Share” button to upload it to the Scratch website. Add a fun title and description so others can enjoy and remix your project.
What You’ve Learned
By building the Sprite Dance Party, you’ve:
- Learned the basics of Scratch’s interface.
- Used motion blocks to create movement.
- Added music and sounds for a complete experience.
- Explored event-driven programming with key presses.
- Enhanced creativity with costumes, effects, and customizations.
Wrapping Up
Congratulations! You’ve just completed your first Scratch project. How does it feel? By mastering these basics, you’ve laid the foundation for more complex projects, like creating games or interactive stories.
Next up, we’ll explore the Scratch interface in even more detail and build something even cooler. But for now, celebrate your achievement—maybe with a real dance party?
This chapter isn’t just about learning—it’s about having fun while doing it. The more you experiment, the better you’ll get. So, keep playing, keep creating, and get ready for an exciting journey ahead!
What’s your favorite part of this project? Let’s chat about it!

CBSE Math Course for Grade 1-8 – Live 1 on 1 session
Master mathematics with our CBSE-aligned Math Course designed for students in Grades 1-8. This cours…

CBSE 12th Computer Science Revision Course
Join us for an exclusive online revision session, where we’ll predict the most expected questi…
Java programming for ICSE 10th
Key Features Comprehensive Syllabus Coverage Interactive Learning Exam-Oriented Approach Beginner-Fr…
App Development for Kids
Empowering Young Minds: MIT App Inventor for Kids This comprehensive 16-hour course introduces kids …

Scratch Programming Course for Complete Beginners
Start Your Scratch Programming Journey Today for FREE! Unlock your creativity and coding potential w…
Find the perfect course!
Want to Master in Scratch Programming?Have a free trail class with us

Elementary Concepts of Objects and Classes in Java Programming
Elementary Concepts of Objects and Classes in Java Programming Java, known for its versatility and w…
10 simple ways to Create a easy Virtual Pet Game in Scratch Programming
Creating a Virtual Pet Game in Scratch Programming: A Step-by-Step Guide

Crazy Scratch Project on Sprite Dance Party
Scratch Programing Project on Sprite Dance Party Scratch: The Basics Welcome to the second chapter o…
How to Create a Catch an item Game using Scratch Programming
Hey there, fellow coders! Ready to dive into the awesome world of Scratch? This visual programming l…

Top Coding Quiz!
Test your knowledge with Coding Scratch Quizzes! Improve your Scratch coding abilities through inter…
What is Sound block in Scratch programming?
Hey there, young coder !Are you ready to make your Scratch projects come to life with sound? Whether…
