Table of Contents
Simple Calculator App in MIT App Inventor
Hey there! Today, we’re going to create a Simple Calculator app using MIT App Inventor. This is one of the easy MIT App Inventor projects that’s perfect for kids and beginners to start with app development. We will make an app that can add, subtract, multiply, and divide numbers.
Let’s break it down step by step, and I’ll explain everything in a way that’s fun and simple!
Step 1: Open MIT App Inventor
- Go to the MIT App Inventor website: appinventor.mit.edu.
- Click on “Create Apps!” to open the designer. You’ll need to sign in with your Google account.
Step 2: Designing the Interface
Here, we’ll build the look of the app – where all the buttons and text will go.
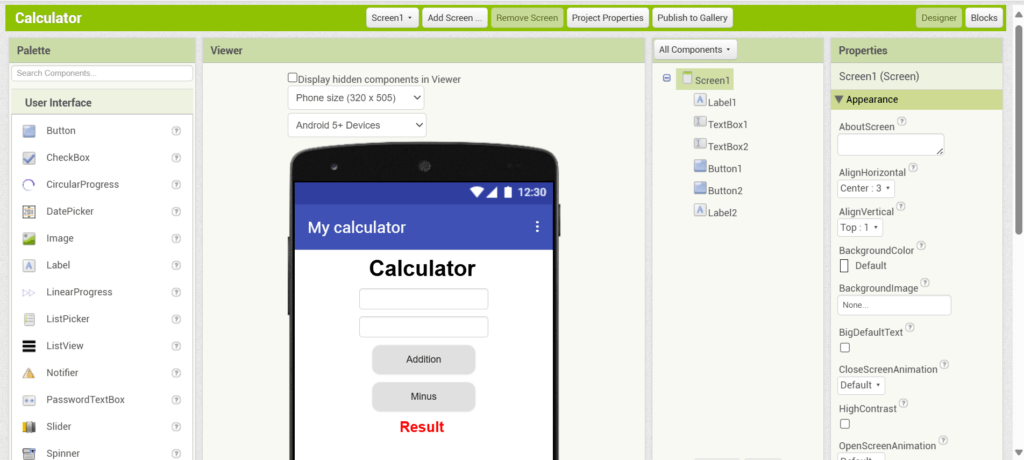
- Add a Label for the result:
- Drag a Label from the “User Interface” section on the left side of the screen.
- Drop it onto the Viewer area.
- In the Properties panel on the right, change the Text property to “0” (this will be the starting value).
- Change the FontSize to make it bigger, like 30, so it’s easy to see.
- Add Buttons for the numbers and operations:
- Drag and drop 10 Buttons onto the screen for the numbers 0 through 9.
- Label them with numbers (e.g., 1, 2, 3, etc.).
- Add 4 more Buttons for the basic operations: + (addition), – (subtraction), * (multiplication), and / (division).
- Add a Button for the Equals (=) sign to calculate the result.
- This will trigger the action to perform the math.
- Add a Button for Clear to reset everything.
Step 3: Writing the Code (Blocks)
Now comes the fun part! You’ll code the app using blocks. Don’t worry – it’s not hard. MIT App Inventor makes coding easy by using colorful blocks that you can drag and drop. Let’s get started:
- Setting up Variables:
- First, we need a variable to store the current number or operation.
- Go to the Blocks section (at the top of the screen) and click on the Variables drawer.
- Create two variables: currentValue (to store the number displayed on the screen) and operation (to store the current operation, like + or -).
- When a Number Button is Clicked:
- For each number button (1, 2, 3, etc.), we’ll make the app update the Label text to show the new number when you click it.
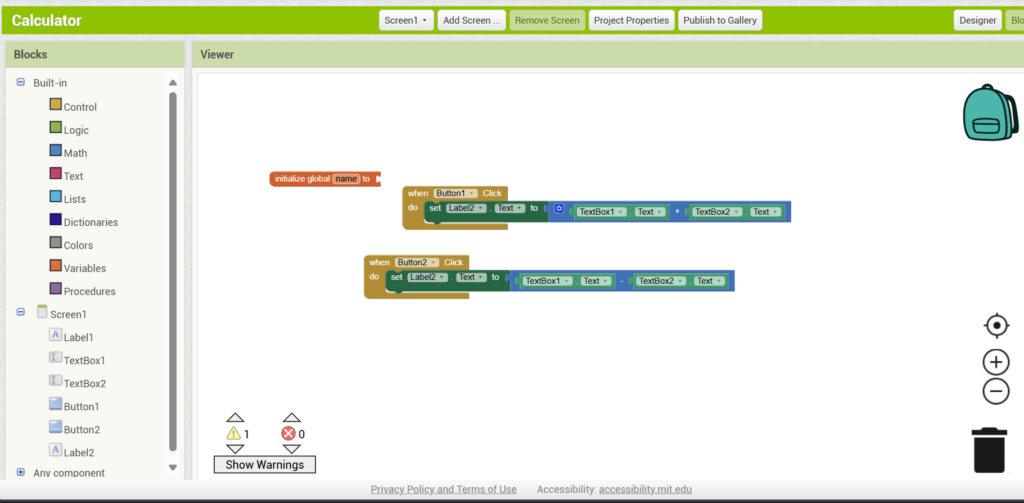
- Click on the Button1 (number 1) in the Blocks section, then drag out the When Button1.Click block.
- Inside that block, use the set Label.Text to block, and change the text to add the number “1” to the current label.
- When an Operation Button is Clicked (e.g., +, -, etc.):
- When you press a button like “+” or “-“, the app should remember the operation. So, when the user hits =, it will calculate the result using the saved operation.
- Drag the When ButtonAdd.Click block and set the operation variable to “+”.
- When Equals Button is Clicked:
- This is where the magic happens! When the equals button is pressed, the app will perform the calculation.
- Inside this block, you’ll use a series of if-else statements to check what operation was selected and calculate the result accordingly.
- For example:
- If the operation is “+”, add the current value to the saved number.
- If the operation is “-“, subtract, and so on.
- Clear Button:
- When you press the Clear button, you want to reset everything back to zero. So, just set the Label.Text to “0” and reset the operation variable.
Step 4: Putting It All Together (The Blocks Code)
Here’s the basic idea of how the blocks will look:
- When a number button is clicked:
When Button1.Click set Label.Text to Label.Text + "1" - When an operation button is clicked:
When ButtonAdd.Click set operation to "+" - When Equals button is clicked (This checks the operation and calculates the result):
When ButtonEquals.Click if operation = "+" set currentValue to currentValue + number set Label.Text to currentValue if operation = "-" set currentValue to currentValue - number set Label.Text to currentValue - Clear Button:
When ButtonClear.Click set Label.Text to "0" set operation to ""
Step 5: Testing the App
- Once you’ve added all the blocks, click the Connect button at the top and choose AI2 Companion to test the app on your phone.
- Scan the QR code that appears on the screen with the MIT AI2 Companion app on your phone.
- Now, try entering numbers and operations, and see how the app performs the calculations!
Wrapping Up
Congrats, you just created your first MIT App Inventor project – a Simple Calculator! 🎉
You’ve learned how to:
- Create a user interface with buttons, labels, and more.
- Use variables to store values like numbers and operations.
- Handle button clicks to update values and perform calculations.
- Write basic logic to check which operation to perform and show the result.
This is just the beginning, and now that you have a working calculator, you can keep improving it. Try adding more advanced features like decimal points or even a memory function. The world of app development for kids is full of exciting possibilities!
Project 2: To-Do List App in MIT App Inventor
Hey there! Now that you’ve made a Simple Calculator app, let’s move on to another super fun and easy project: a To-Do List App. This is one of the best MIT App Inventor projects for kids, and it’s perfect for beginners who want to dive into app development projects for kids. The idea is simple: you’ll be able to add tasks, mark them as done, and even delete them!
Let’s get started!
Step 1: Open MIT App Inventor
- Go to the MIT App Inventor website: appinventor.mit.edu.
- Click on “Create Apps!” and sign in with your Google account.
- Click Start New Project, and name it something fun like “To-Do List”.
Step 2: Designing the Interface
This is where you make your app look cool and user-friendly. We will add a few elements like buttons, text boxes, and lists.
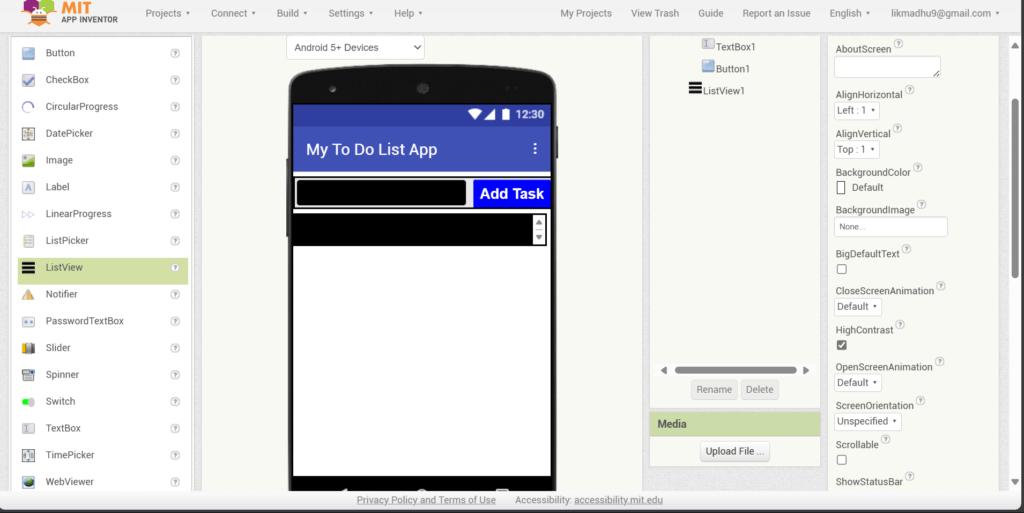
- Add a Label for the Title:
- Drag a Label from the “User Interface” section on the left side of the screen.
- Drop it onto the screen.
- Change the Text in the properties to something like “My To-Do List”.
- You can also increase the FontSize to make the title stand out.
- Add a Text Box for Task Input:
- Drag a TextBox onto the screen. This is where users will type in their tasks.
- Change the Hint property of the TextBox to something like “Enter a task…” to give users a hint on what to do.
- Add a Button to Add Tasks:
- Drag a Button to the screen and label it as “Add Task”.
- This button will be used to add the task typed in the TextBox to the list.
- Add a ListView to Display Tasks:
- Drag a ListView onto the screen. This is where the tasks will appear once they’re added.
- You don’t need to set any text for the ListView yet; it will automatically show the tasks once we add them.
- Add a Button to Clear Tasks:
- Drag another Button onto the screen and label it “Clear List”.
- This button will be used to clear all tasks from the list.
Step 3: Writing the Code (Blocks)
Now, let’s move on to the fun part: coding the app! In MIT App Inventor, you don’t write traditional code; instead, you use blocks that snap together like puzzle pieces. Ready? Let’s go!
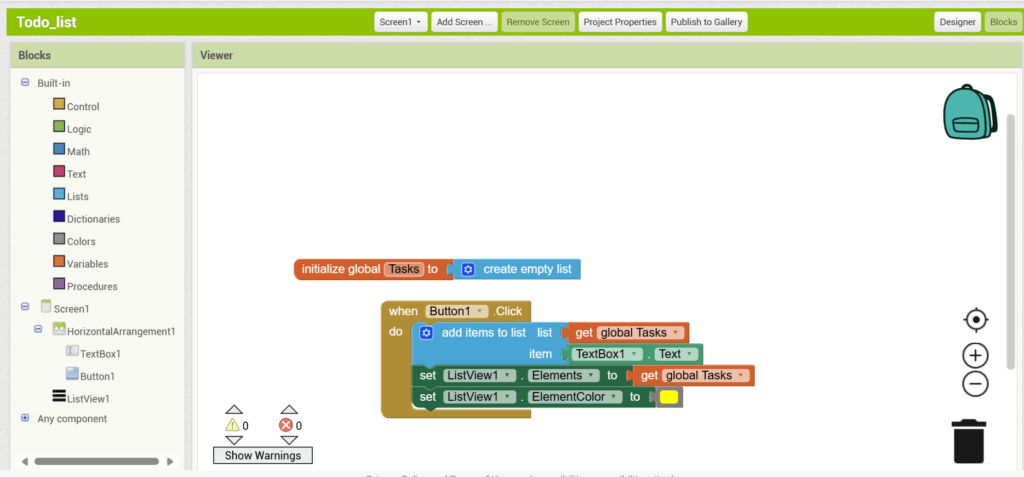
- Create a Variable to Store Tasks:
- In the Blocks section, go to the Variables drawer.
- Create a new variable called taskList. This will store all the tasks that the user adds to the list.
- Set taskList to an empty list at the start, so we can add tasks to it later.
- Add a Task:
- When the user clicks the “Add Task” button, you want to add the task they typed into the TextBox to the taskList.
- Drag the When ButtonAddTask.Click block from the blocks menu.
- Inside this block, we’ll add the following:
- Get the text from the TextBox using the block TextBox1.Text.
- Add that text to the taskList using the add items to list block.
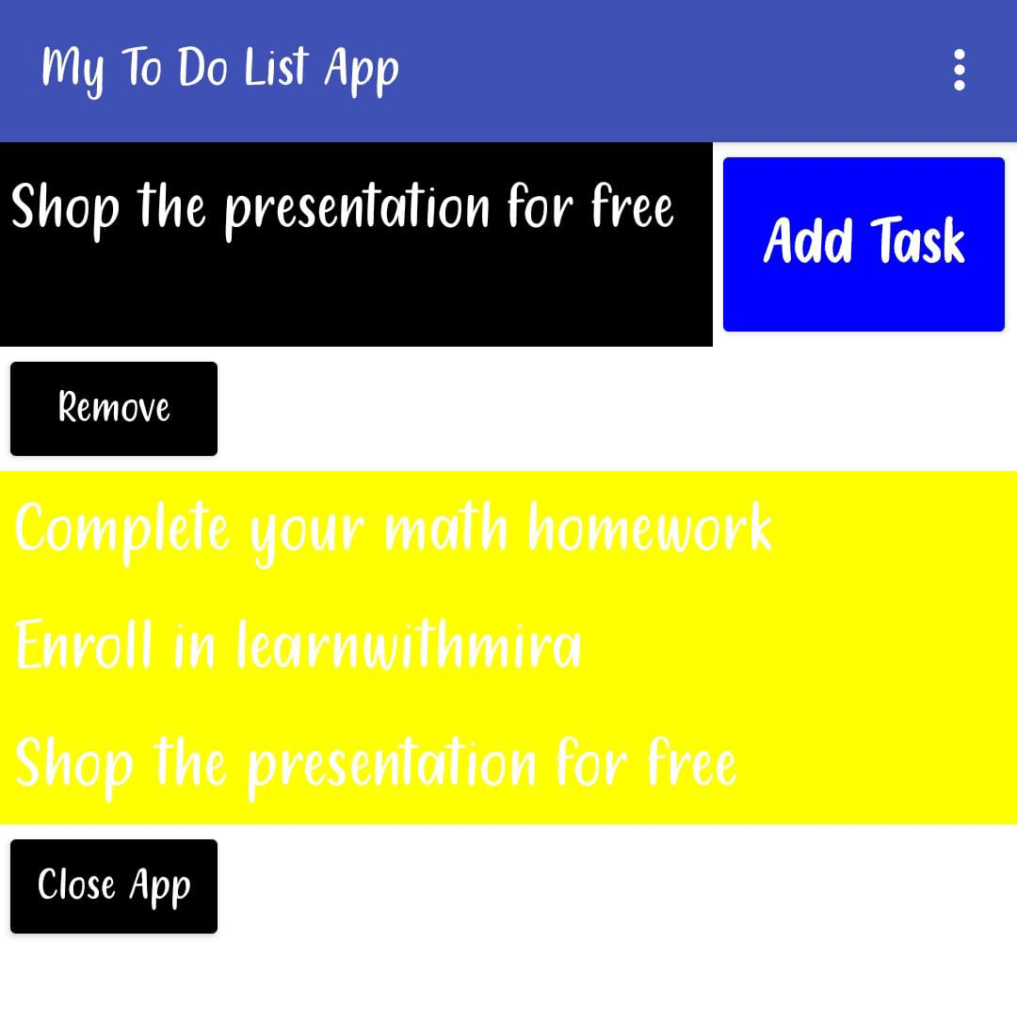
- Set the ListView‘s Elements property to the taskList so the tasks will appear.
When ButtonAddTask.Click add TextBox1.Text to taskList set ListView.Elements to taskList set TextBox1.Text to "" // Clear the text box after adding the task - Clear All Tasks:
- When the user clicks the “Clear List” button, you want to clear all the tasks from the taskList.
- Drag the When ButtonClearList.Click block.
- Inside this block, set the taskList to an empty list using the create empty list block.
- Also, set the ListView.Elements to the empty list to remove all tasks from the list.
When ButtonClearList.Click set taskList to create empty list set ListView.Elements to taskList
Step 4: Enhancing the App (Optional)
Now that you have the basics down, let’s add some extra features to make the app even cooler!
- Mark Tasks as Done:
- You could make each task clickable so the user can mark it as “done” or “completed”.
- To do this, when the user clicks a task in the ListView, you can change its text style to show it’s done (e.g., change the text to strikethrough or add a “✔” at the beginning).
- Delete Tasks:
- You could also add a Delete button next to each task, so users can remove individual tasks from the list.
Step 5: Testing the App
- After you’ve added all the blocks and designed the screen, click the Connect button at the top of MIT App Inventor.
- Select AI2 Companion, and scan the QR code that appears with the MIT AI2 Companion app on your phone or tablet.
- Now, you can test the app! Try adding a task by typing in the TextBox and clicking the “Add Task” button. You should see the task appear in the ListView. You can also click the “Clear List” button to delete all tasks.
Wrapping Up
Congratulations, you just created a To-Do List app in MIT App Inventor! 🎉
Here’s a recap of what you learned:
- How to design a simple user interface with labels, text boxes, buttons, and lists.
- How to create and use variables to store and manage your tasks.
- How to handle button clicks and update the app dynamically.
- How to clear tasks and add new ones.
This is just the beginning! You can keep improving the app by adding more cool features like sorting tasks, setting due dates, or even saving the list so that it stays when you open the app next time.
Enjoy your journey into app development projects for kids and keep exploring easy MIT App Inventor projects to make even more fun apps!